SpotSpy - Add on for SpotCollector

Author: DL9HO


SpotSpy is a Add on program specially developed for using with SpotCollector. It extands SpotCollectors features to support visible and audible alarms for needed callsigns, IOTA's, RDA's, WWFF's, POTA's, SOTA's, WAZ, 5B-WAS, FFMA, clubmembers and DXCC entities.

SpotSpy scans the SpotCollector Spot database for new spots. The scan interval is controlled by the scan interval setting in the SpotSpy configuration window. The default scan interval is 30 seconds.

Installing SpotSpy

SpotSpy comes with an setup. Click on the link below to download the full package and run the setup.exe application on your system.

Make sure your Firewall and anti-malware applications are configured to consider SpotSpy.exe and SpotSpyUpdater.exe "Safe"

 Download SpotSpy Setup

You must have Microsoft Data Access Components (MDAC) installed on your computer.

The Microsoft Data Access Components (MDAC) are a standard database interface for Windows. MDAC is already included as part of Windows 98, Windows 2000, Windows ME, and Windows XP. Some early Windows 98 OEM systems shipped without MDAC, however. MDAC is also already installed on your system if you have Internet Explorer 5.0 (or higher) or Microsoft Office. MDAC is FREE and is fully supported by Microsoft on all versions of Windows.

SpotSpy require MDAC version 2.5 or higher, with MDAC 2.8 recommended. Windows 2000 ships with version 2.5, and Windows XP ships with version 2.7. If you have a Windows 95, 98 or Windows NT system, installing version 2.5 or higher is required. While older versions of MDAC may work, they may be very slow or have memory leaks. For best performance, you should install MDAC 2.8 on all versions of Windows.

If your system does not already have MDAC installed, you need to download it and install it according to the instructions given here. There is no way to run the application without MDAC. To check to see what version of MDAC is already installed on your system, use the MDAC Checker program described below.

 Download MDAC_TYP.exe 2.8 SP1

To see what version of MDAC you are using, or to check your MDAC installation for compatibility or corruption, you can download the MDAC Component Checker application. This is a Microsoft application written to determine if your MDAC installation has any problems.

 Download MDAC Component Checker


First steps

SpotSpy will automatically detect the paths to your spots and log database. The detected paths will be displayed in SpotSpy's configuration window. Clicking on the Browse buttons displays a file selector that can be used to specify a different Spot Database or Log Database path name. Note that SpotSpy will work only with DXKeepers and SpotCollectors databases.


When you start the program for the first time, SpotSpy will direct you to the configuration window to add the path to the IOTA database. The path is necessary for displaying some additional information. You can ignore this step if you are not interested in this additional information.

Any changes in the configuration window will be saved.

Configuring SpotSpy

SpotSpy's Configuration screen provides four tabs:

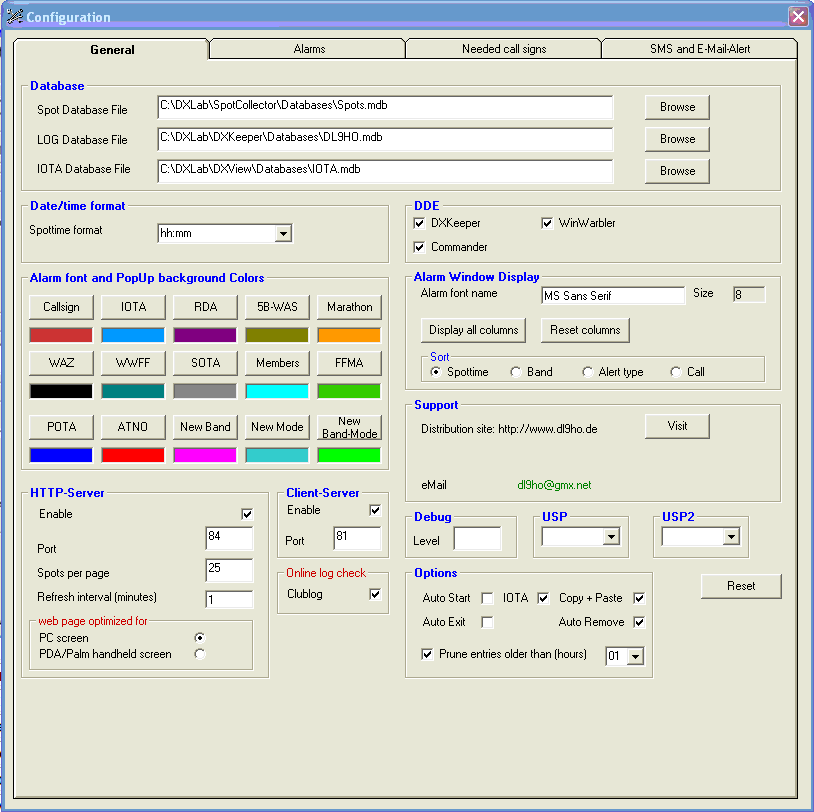
General tab


Spottime format This Combobox lets you specify the format of dates and times that appear in SpotSpy's Spot tracking window
Font name Specifies the font used to display alerts in SpotSpy's alert window; clicking this textbox will display a standard Windows font selector dialog box
Client-Server Enable If checked, enables the server to forward alerts to all connected SpotSpyClient applications in your network
Client-Server Port Specifies the TCP port used by SpotSpy's Client-Server to forward alerts to the SpotSpyClient application
HTTP-Server Enable If checked, enables the HTTP web server to respond to incoming requests and generate an web page showing the last N SpotSpy alerts
HTTP-Server Port Specifies the TCP port used by SpotSpy's HTTP web server
HTTP-Server Spots per page number of alerts shown on generated web page
HTTP-Server Refresh interval (minutes) number of number of minutes between webpage updates
Auto Start If checked, SpotSpy will automatically start the scan process on startup
IOTA If checked, SpotSpy will display a separate window with all IOTA spots
Copy + Paste If checked, Copy & Paste is allowed for Needed call signs text box
Auto Remove If checked, removes entries from the alerts window automatically when a station is worked on the band and mode
Prune entries older than (hours) When checked, the alerts window is automatically pruned; entries older than the specified age (in hours) will be deleted
DDE DXKeeper If checked, double-clicking in SpotSpy's alert window sends information to DXKeepers's caption window
DDE Commander If checked, double-clicking in SpotSpy's alert window sends information to DXLab Commander
DDE WinWarbler If checked, double-clicking in SpotSpy's alert window sends information to DXLab WinWarbler
Display all columns When clicked, all available columns in SpotSpy's alert window will be displayed
Reset columns When clicked, resets the displayed columns in SpotSpy's alert window to default
Clublog If checked, right clicking in SpotSpy's alert window provides online logcheck for available DXPeditions in Clublog


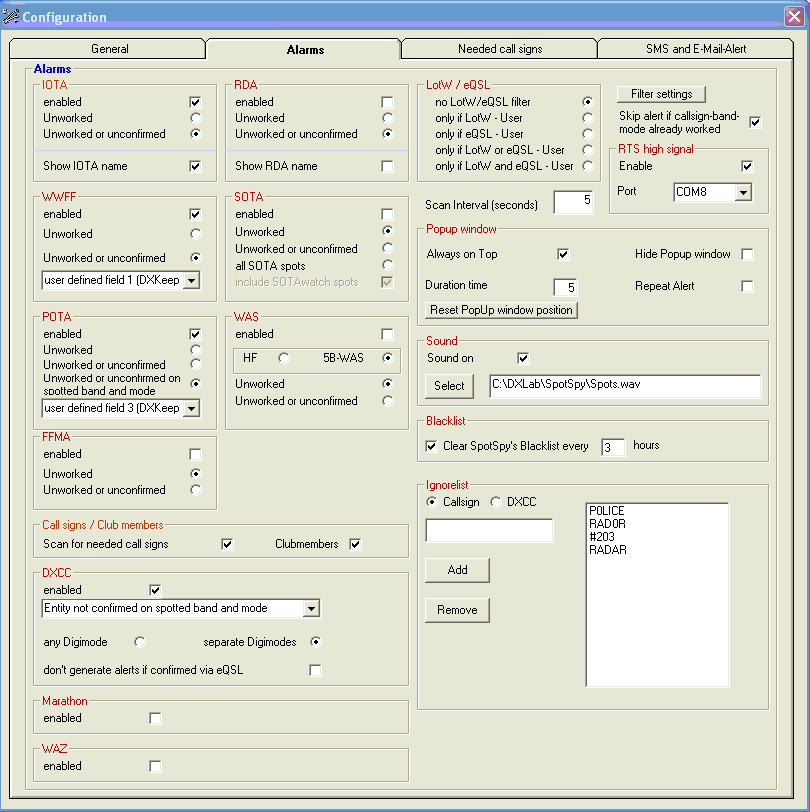
Alarms tab


Scan Interval Specifies the interval (in seconds) at which SpotSpy scans the SpotCollector Database for new spots
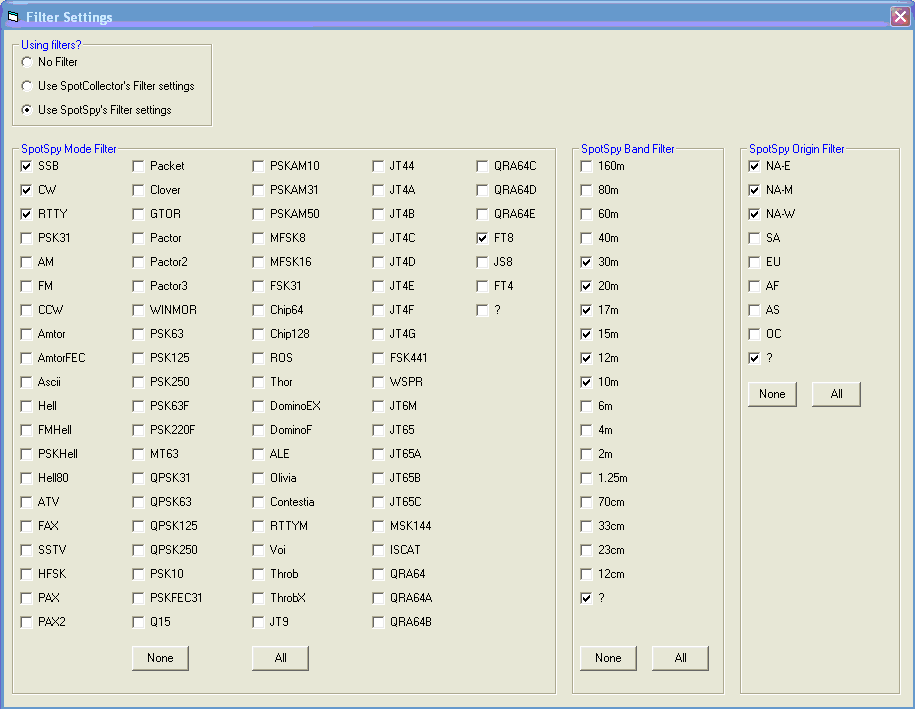
Filter settings button Click to display the Filter settings window
Enable RTS high signal If checked, SpotSpy generates an RTS high signal on specified COM port
Always on Top Uncheck this box if SpotSpy's alert window steals other applications the focus. Default is checked
Hide Popup window If checked, SpotSpy will not display SpotSpy's Alert Popup window (Default is unchecked)
Duration time Popup window visible for n seconds (Default is 30 sec.)
Repeat Alert When checked, SpotSpy will display the alert popup for every new spot
Reset PopUp window position If clicked, the position of the flashing PopUp window will be resetted to the default settings
Show IOTA name If checked, SpotSpy displays IOTA reference number and IOTA name in the title bar
Show RDA name If checked, SpotSpy displays RDA district number and Russian oblast name in the title bar
include SOTAwatch spots When checked, SpotSpy feed SpotCollector with spots from SOTAwatch
Scan for needed Call signs If checked, SpotSpy scans new spots for call signs and displays an alert
only if LotW - User If checked, SpotSpy will generate an alert if the spotted callsign is a trusted LotW user
only if eQSL - User If checked, SpotSpy will generate an alert if the spotted callsign is a trusted eQSL user
Sound on If checked, SpotSpy sounds an audio alarm
Clear SpotSpy's Blacklist... If checked, SpotSpy's blacklist is automatically cleared every x hours; entries older than the specified age are deleted
Ignore list Spots for callsigns or DXCC entities in this list will be ignored
DXCC any Digimode / separate Digimodes
Example: incoming spot for VK1TEST on 20M in FT8
You've confirmed VK on 20M in RTTY, but not in FT8
any Digimode -> SpotSpy will not generate an alert for this spot
separate Digimodes -> SpotSpy will generate an alert for this spot


No Filter
Use SpotCollectors's Filter settings SpotSpy will use SpotCollector's Band, Band UTC Start/End, Mode and Origin filters
Use SpotSpy's Filter settings SpotSpy will use the filter settings defined in SpotSpy's Filter settings window, regardless of SpotCollector's filter settings


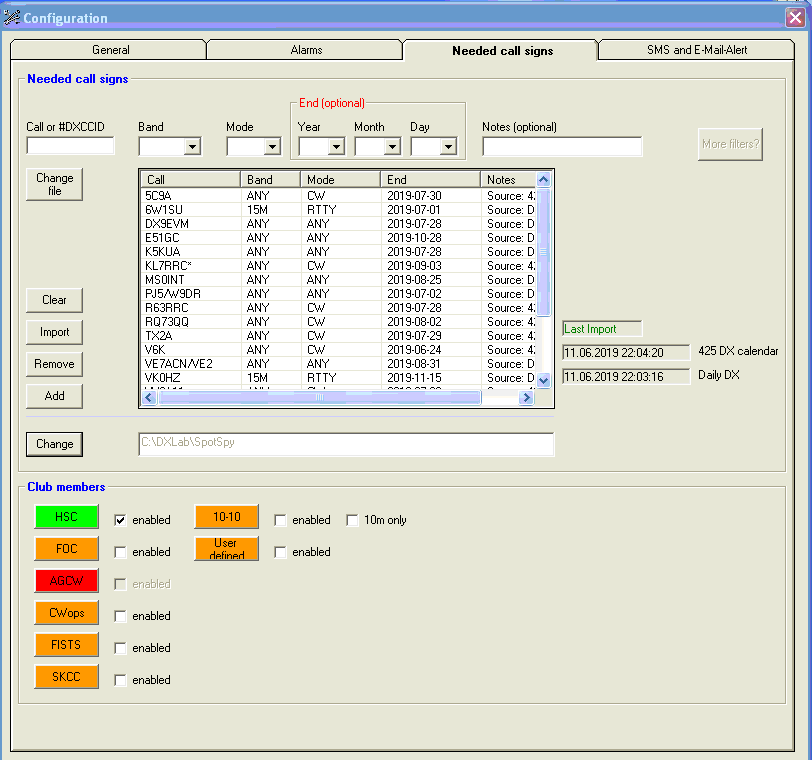
Needed Call signs tab


Change file button in Needed Call signs Click to change to second needed call signs file
Add button in Needed Call signs Enter the needed call sign in the text box, select Band, Mode and End date (registered version only) and press the Add button to add a new entry
You can use wildcards at the beginning or end of a partial call sign (VK9* , */p etc.)
End date is optional. Default is 2099-01-31. Entries with expired dates will be removed automatically

Since Rel. 1.7.9 it's also possible to use the DXCC entity code with a prefixed # in front of the entity code. All prefixes are then covered (licensed version only).
Example:You want to be alerted whenever Easter Islands comes on RTTY on any band. Easter Island has many prefixes, so you would have to make a separate entry for CE0E*, XQ0*, XR0* and so on. Put in Easter Island's entity code #47 and RTTY and Any.
Remove button in Needed Call signs Select an existing Call sign and press the Remove button to remove the specified call sign
Clear button in Needed Call signs Click to remove all call signs
Import button in Needed Call signs Click to open Import window for import 425 DX Calendar data


Click on column heading text to sort by a column.

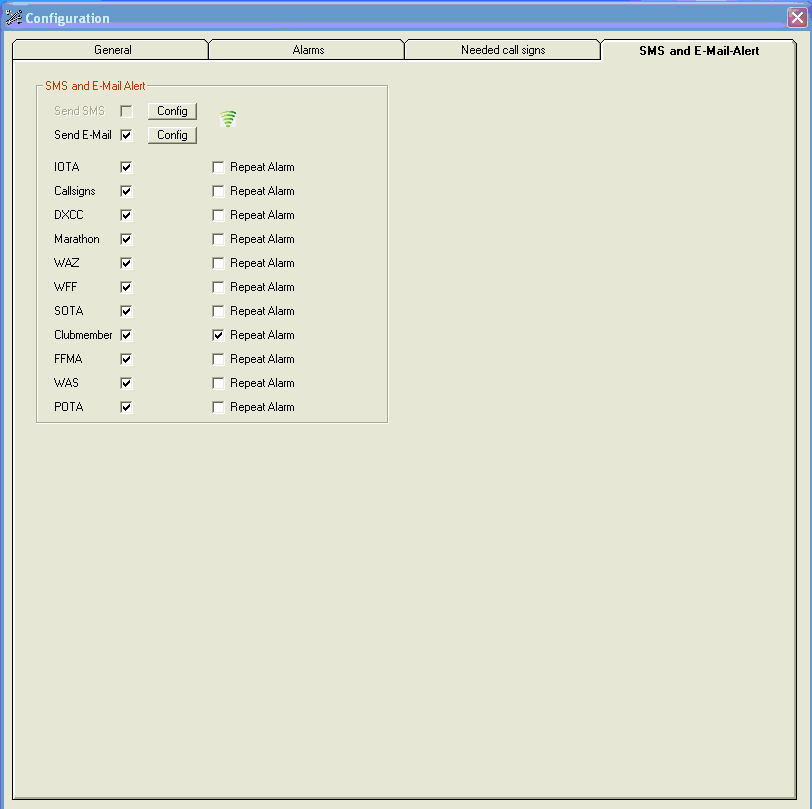
SMS and E-Mail-Alert tab


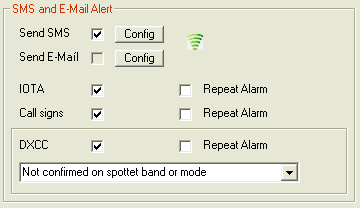
SMS Alert If checked, SpotSpy will send an SMS to a specified mobile phone
E-Mail Alert If checked, SpotSpy will send an e-mail to a specified e-mail adress


Features

IOTA tracking (if enabled in configuration window)


If a new spot with IOTA information is found, SpotSpy extracts the IOTA number from spot notes and searches the DXKeeper's log database for any contacts with this IOTA.

If this is a new one or an unconfirmed (depending on your settings in configuration), SpotSpy

  • displays IOTA reference number, frequency, Call sign (bold characters if LotW member) and Spot-Time in SpotSpy's alerts window
  • displays IOTA Reference number and IOTA name in the title bar (if path to IOTA database is available)
  • displays a pop-up window with IOTA reference number (visible for 30 seconds)
  • sounds an audio alarm (if enabled in configuration, default is sound on)

    WFF tracking (if enabled in configuration window)

    If a new spot with WFF information is found, SpotSpy extracts the WFF number from spot notes and searches the DXKeeper's log database for any contacts with this WFF.

    If this is a new one or a unconfirmed (depending on your settings in configuration), SpotSpy

  • displays WFF reference number, frequency, Call sign (bold characters if LotW member) and Spot-Time in SpotSpy's alerts window
  • displays WFF Reference number and WFF name in the title bar
  • displays a pop-up window with WFF reference number (visible for 30 seconds)
  • sounds an audio alarm (if enabled in configuration, default is sound on)

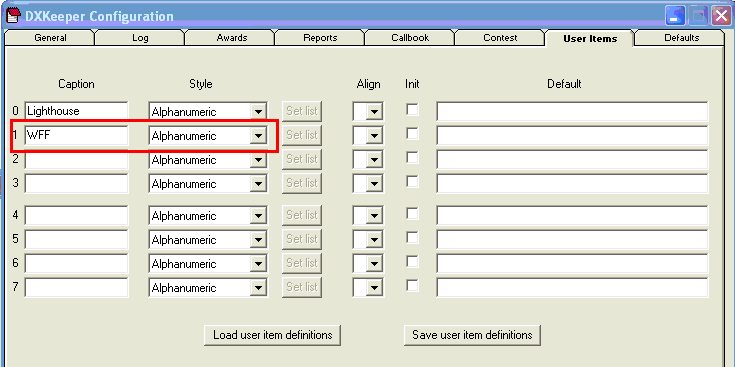
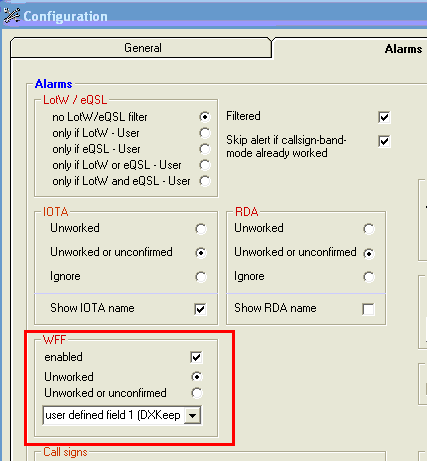
    How to prepare DXKeeper and SpotSpy to track WFF contacts?

    Open DXKeepers configuration, User items tab and create an user defined field (Caption 'WFF', Style 'Alphanumeric').


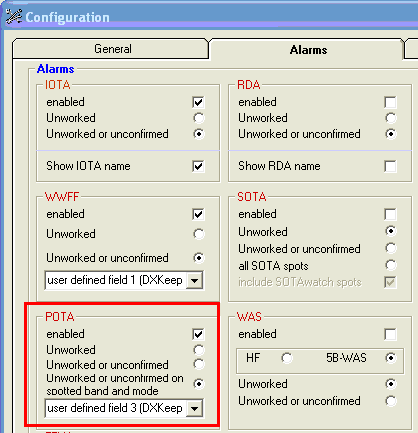
    Open SpotSpys configuration window, Alarms tab and enable WFF. Select the created user item field in the combobox below.


    Note that it is necessary to log the WFF reference in format XXXX-XXXX or XXX-XXXX (e.g. DLFF-0089 or FFF-0001)


    POTA tracking (if enabled in configuration window)

    If a new spot with POTA information is found, SpotSpy extracts the POTA number from spot notes and searches the DXKeeper's log database for any contacts with this POTA.

    If this is a new one or a unconfirmed (depending on your settings in configuration), SpotSpy

  • displays POTA reference number, frequency, Call sign (bold characters if LotW member) and Spot-Time in SpotSpy's alerts window
  • displays a pop-up window with POTA reference number (visible for 30 seconds)
  • sounds an audio alarm (if enabled in configuration, default is sound on)

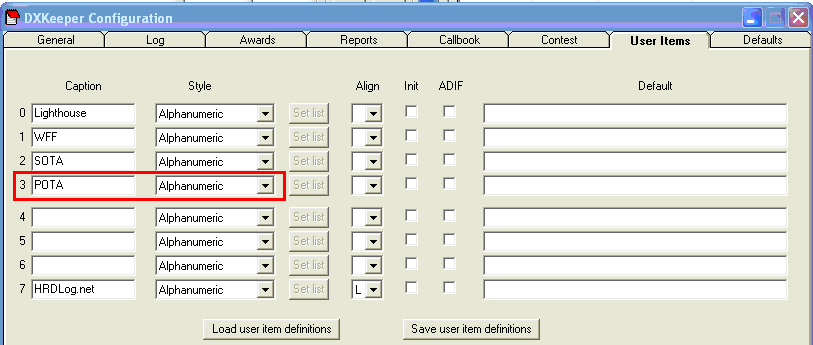
    How to prepare DXKeeper and SpotSpy to track POTA contacts?

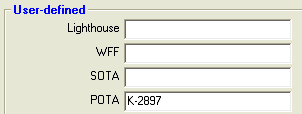
    Open DXKeepers configuration, User items tab and create an user defined field (Caption 'POTA', Style 'Alphanumeric').


    Open SpotSpys configuration window, Alarms tab and enable POTA. Select the created user item field in the combobox below.


    Note that it is necessary to log the POTA reference in format X-XXXX or XX-XXXX (e.g. K-2897 or VE-1225)


    SOTA tracking (if enabled in configuration window)

    If a new spot with SOTA information is found, SpotSpy extracts the SOTA number from spot notes and searches the DXKeeper's log database for any contacts with this SOTA.

    If this is a new one or a unconfirmed (depending on your settings in configuration), SpotSpy

  • displays SOTA reference number, frequency, Call sign (bold characters if LotW member) and Spot-Time in SpotSpy's alerts window
  • displays SOTA Reference number and SOTA name in the title bar
  • displays a pop-up window with SOTA reference number (visible for 30 seconds)
  • sounds an audio alarm (if enabled in configuration, default is sound on)

    Note that it is necessary to log the SOTA reference in format XXX/XX-XXX or XX/XX-XXX or X/XX-XXX (e.g. W7W/MC-074 or W1/AM-302 or F/AB-001)


    RDA tracking (if enabled in configuration window)

    If a new spot with RDA information is found, SpotSpy extracts the Russian district from spot notes and searches the DXKeeper's log database for any contacts with this district.

    If this is a new one or a unconfirmed (depending on your settings in configuration), SpotSpy

  • displays RDA district number, frequency, Call sign (bold characters if LotW member) and Spot-Time in SpotSpy's alerts window
  • displays RDA district number and name of the oblast in the title bar (if RDA.dat file is available)
  • displays a pop-up window with RDA district number (visible for 30 seconds)
  • sounds an audio alarm (if enabled in configuration, default is sound on)

    Call Sign tracking (if enabled in configuration window)

    Every new spotted call sign will be compared with your needed call signs.

    If the spotted call sign is a needed, SpotSpy

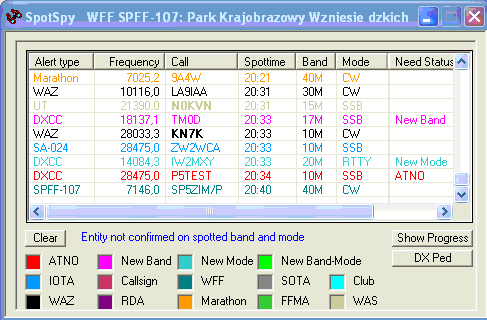
  • displays frequency, Call sign (bold characters if LotW member) and Spot-Time in SpotSpy's alerts window
  • displays a pop-up windows with the Call sign (visible for 30 seconds)
  • sounds an audio alarm (if enabled in configuration, default is sound on)

    Clubmember tracking (Identify clubmembers) (if enabled in configuration window)

    SpotSpy enables you to get alerted when a spotted callsign is member of one or more clubs. SpotSpy supports alerts for HSC, FOC, CWops, AGCW, FISTS, SKCC and 10-10. Other clubs can be added on request.

    You can also import a semicolon-delimited text file to track user defined clubmembers.
    To load a semicolon-delimited text file, click the User defined button (Configuration window, Needed call signs tab, Club members section) to display a navigation window that lets you specify the file to be loaded. Each line of this file should contain a callsign, followed by a semicolon and a info (e.g. member number).

    Example:
    DL0TEST;304
    DL9HO;12 - Volker
    VK0TEST;70

    Example: You want to track members of your local radio club. Name of your local radio club is E34. Enter E34 into the text area of the InputBox which is visible when import has been successfully finished. The entered text will be used for the user defined buttons caption. It will also be used to display the Clubname in SpotSpy's alert window: Alert type column: E34 ⋆ 12 - Volker

    If the spotted call sign is a needed, SpotSpy

  • displays club, clubinfo (e.g. membership number), frequency, Call sign (bold characters if LotW member) and Spot-Time in SpotSpy's alerts window
  • displays a pop-up windows with the Call sign (visible for 30 seconds)
  • sounds an audio alarms (if enabled in configuration, default is sound on)

    How to prepare SpotSpy to track clubmember contacts?

    Open SpotSpy's configuration window, Alarms tab and enable Clubmembers. Change to Needed call signs tab and download memberfiles for one or more clubs. Download can be done by clicking on the button for the club. The color of the button changes from red to orange if the download was successful. Enable the checkbox to activate the scan process for the clublist. The color of the button changes to green if the scan process for the clublist is activated.

    FFMA tracking (Identify needed grids for FFMA award) (if enabled in configuration window)

    SpotSpy enables you to get alerted when a callsign is spotted from an needed grid for the FFMA award. Make sure you have DXViews USAP database installed.

    If the grid is a needed, SpotSpy

  • displays grid, frequency, Call sign (bold characters if LotW member) and Spot-Time in SpotSpy's alerts window
  • displays a pop-up windows with the grid (visible for 30 seconds)
  • sounds an audio alarms (if enabled in configuration, default is sound on)

    CQ DX Marathon tracking

    The licensed version of SpotSpy can issue an alert for spots of calls from DXCC entities and zones where there is a need for the CQ DX Marathon program. To use that feature it is required to
    1. mark the checkbox for Marathon in the configuration window
    If the spotted call sign is a needed, SpotSpy

  • displays frequency, Call sign (bold characters if LotW member), Spot-Time and the word Marathon in SpotSpy's alerts window
  • displays a pop-up windows with the Call sign (visible for 30 seconds)
  • sounds an audio alarms (if enabled in configuration, default is sound on)

    WAZ tracking

    The licensed version of SpotSpy can issue an alert for spots of calls where there is a need for the WAZ program. To use that feature it is required to
    1. mark the checkbox for WAZ in the configuration window
    If the spotted call sign is a needed, SpotSpy

  • displays frequency, Call sign (bold characters if LotW member), Spot-Time and the word WAZ in SpotSpy's alerts window
  • displays a pop-up windows with the Call sign (visible for 30 seconds)
  • sounds an audio alarms (if enables in configuration, default is sound on)

    WAS tracking

    The licensed version of SpotSpy can issue an alert for spots of calls where there is a need for the WAS program. To use that feature it is required to
    1. mark the checkbox for HF or 5B-WAS in the configuration window
    If the spotted call sign is a needed, SpotSpy

  • displays frequency, Call sign (bold characters if LotW member), Spot-Time and the Primary code for the spotted state (e.g. TX, AL, IL) in SpotSpy's alerts window
  • displays a pop-up windows with the primary code (e.g. TX) (visible for 30 seconds)
  • sounds an audio alarms (if enables in configuration, default is sound on)

    Double-clicking on a displayed spot in SpotSpy's alert window will QSY your transceiver to the entry's frequency and mode (if DXLab Commander is running), initialize DXLab DXViews Callsign textbox (if DXView is running) and send the call, frequency and mode to DXKeeper's Capture window and WinWarbler (if WinWarbler is running).

    When you right-click on a displayed spot in SpotSpy's alert window, SpotSpy displays a pop-up menu
    from which you can choose to

  • delete the selected line-item from the alert window and remove the needed callsign from the Needed call signs list (if spot matches band and mode)
  • delete the selected line-item from the alert window (if selected callsign is not in the Needed call signs list)
  • add the selected line-item to the Ignore list
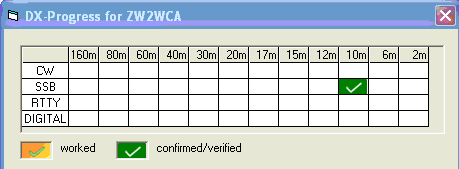
  • display an progress window for the selected callsign (Band / Mode progress - worked/confirmed)
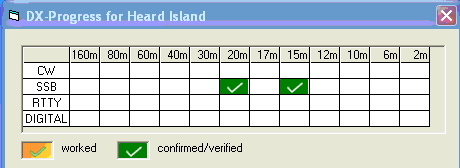
  • display an progress window for the selected DXCC entity (Band / Mode progress - worked/confirmed)
  • open an webbrowser window to show the selected SOTA reference (e.g. DM/SX-041) in SOTA Mapping Project (SOTA spots only)
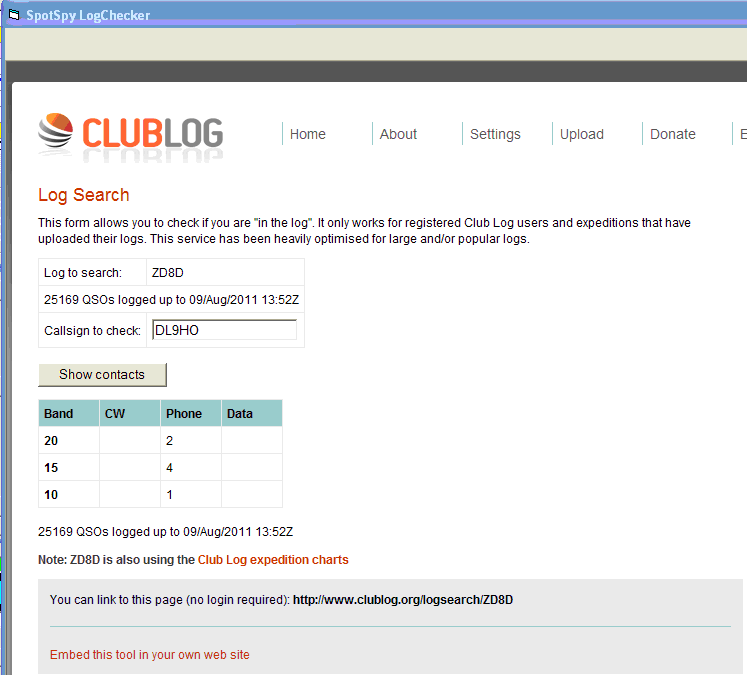
  • lookup Clublog for your callsign to check if you are in the log (if Clublog chart is available for the selected callsign and Clublog online check is enabled in SpotSpy's configuration window)


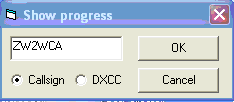
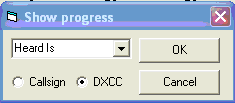
    Click on the Show progress button to display SpotSpy's search window, from which you can query the DXKeepers log database for a target callsign or DXCC entity.


    Enter a target callsign, and then click the OK button to search for band/mode progress (worked/confirmed).


    or

    select a DXCC entity, and then click the OK button to search for band/mode progress (worked/confirmed).


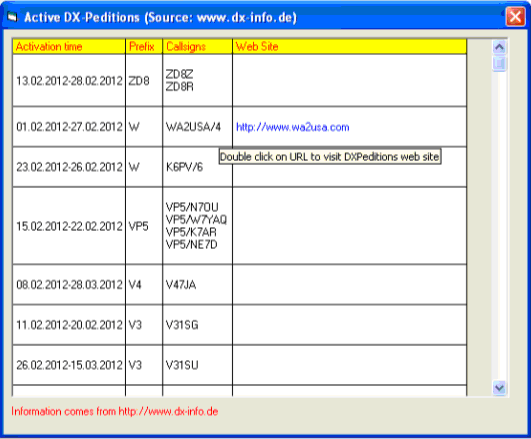
    Click on the DX Ped button to display SpotSpy's DX Peditions window. This window displays the current active DX-Peditions. Information on this window comes from http://www.dx-info.de


    Client-Server

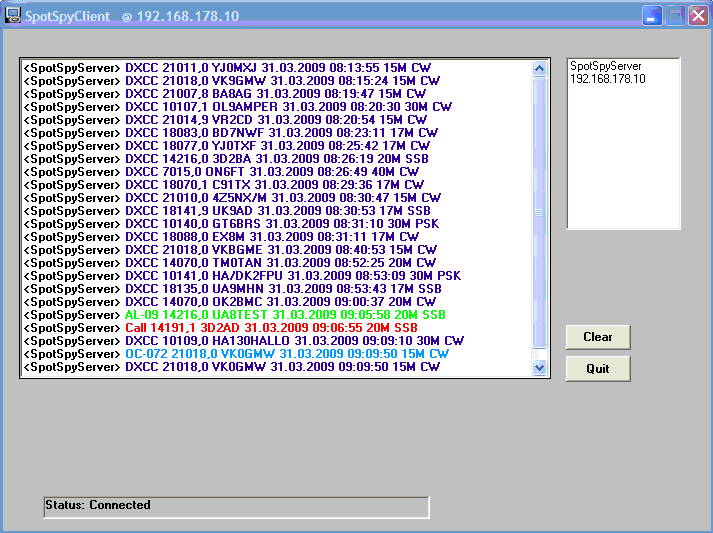
    SpotSpy can forward all generated alerts to any Windows based computers in your network.

    To use this feature

  • Download the Client Installer file SpotSpyClient_setup.exe
  • Run the Client Installer file on every computer in your home network to install the Client application.
  • Open SpotSpy's configuration window and type an available port into the text box (Server part). Enable the checkbox in this section to activate the Server feature of SpotSpy. If the checkbox is activated, SpotSpy will listen on the specified port for login requests from your other clients. Every alert will be forwarded to all connected clients and displayed in SpotSpyClient's window. Font color for alerts will be the same as in SpotSpy.
  • Run SpotSpyClient on any computer in your local network. When you start the application for the first time SpotSpyClient will ask for port number and IP adress of the Computer where SpotSpy is running (IP adress of your SpotSpy computer will be displayed in Tool tip in SpotSpy's Server section). Your entries will be saved for further logins (but change is possible). Enable Sound if you wish to get an audio alert when an new alert arrived. The client application will reconnect automatically if connection gets lost.


    Web-Server
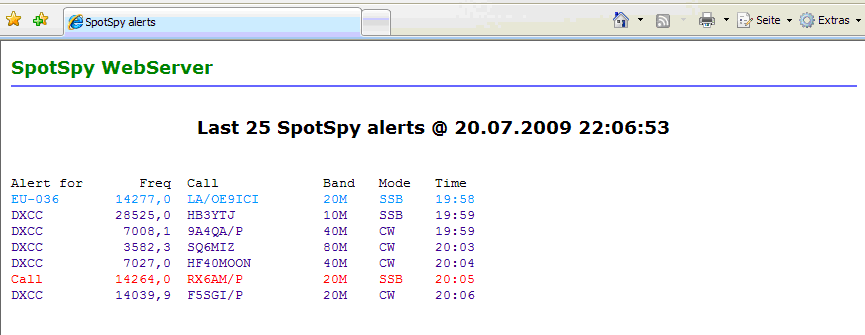
    Additionally a HTTP web server is integrated into SpotSpy. It makes an automatically generated web page available (http://IP_adress_of_your_SpotSpy_PC:Port/alerts.htm; e.g. http://192.168.178.10:84/alerts.htm) showing the last N SpotSpy alerts. The web page can be retrieved by any browser. SpotSpys web server feature is recommended for users with handhelds (PDA ...) coming with Windows CE or Windows Mobile OS. Access over Internet is available (Port forwarding).
    The web page screen layout can be adapted to different demands (Optimized PC screen layout and optimized PDA / Palm screen layout).

    Optimized PC screen layout

    Optimized PDA / Palm handheld screen layout


    Import 425 DX calendar data to needed call signs

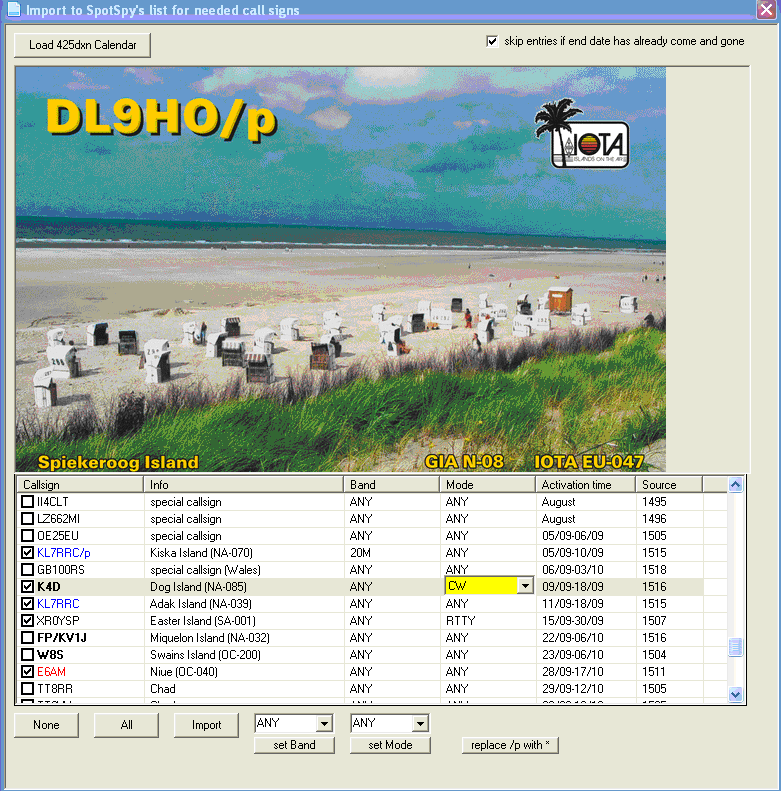
    The 425 DX Calendar (see http://www.425dxn.org/425/calendar.html) offers a good overview of present or future DX or IOTA activities. SpotSpy offers the possibility to

  • Import all or user-selected published calls with the corresponding data into SpotSpy
  • Raise an alert whenever a call out of this imported list will be spotted and listed in Spotcollectors database

    At the moment SpotSpy acts as substitute for the manual memory, i.e. it avoids the need to write down the information and do a follow up, e.g. by typing in a call into SpotSpys Needed Calls list at the time when a needed call will become active. As of today SpotSpy

  • Does not compare published data against the information in your log if you still need a specific DXCC
  • Does not select a call for import based on such DXCC information

    but

  • Compares published IOTA information with the DXKeeper log database if the specific IOTA is still needed (i.e. not verified or confirmed)
  • Displays the call of that specific IOTA in coloured letters (blue as of today, different colours to separate unconfirmed and unverified are on the enhancement list)
  • Automatically selects that specific IOTA for Import
  • Compares published DXCC information with the DXKeeper log database if the specific DXCC is still needed (i.e. never worked on any band or mode)
  • Displays the call of that specific DXCC in coloured letters (red as of today, different colours to separate unconfirmed and unverified are on the enhancement list)
  • Displays the call of LotW members in bold characters
  • Automatically selects that specific DXCC for Import

    The handling of DXCC information in a similar way as IOTAs is planned for implementation later the year. This means that you still have to remember at the moment or look up yourself if the published information contains a DXCC entity you still need. However, using the Band/Mode filter you can specify for what bands and modes you may want to get an alert. This information is useful in particular for those awards which are not supported by Spotcollectors general selection criteria (e.g. when you look for UA0zz in Zone 20 on 160m).

    To import the data use the following steps:

    1. Open SpotSpys configuration window
    2. Click on Import
    3. Click on Load 425 DXN Calendar (optional enable skip entries if end date has already come and go)
    4. A separate window will open showing either a DL9HO qsl as indication that the connection to the 425DXN web site could be established or more detailed information that the web site is not accessible at the moment
    5. When the 425 DX Calendar has opened in a separate window either
      a. Select All by clicking on the corresponding button and uncheck the calls you are not interested in by clicking on the checkbox or
      b. Select the calls you are interested in by clicking on the checkbox for that call (please note that unconfirmed or not verified IOTAs are selected automatically, see above)
    6. Adjust Band or Modes in the ListView window according to your specific requirements in the following way:
      a. Double click at the Band or Mode element and a combobox will open for selecting the band or mode
      b. Leaving the combobox will force the entry to change from Any to the selected band or mode
      c. If a call is needed on several bands and modes the import can be replicated several times. Only those entries will be important if there is a change in the data (example: VK9Nxx can be imported with 160 m SSB as well as with 80 m CW, 10 m ANY)
      d. Addressing the different elements can be done using the Tab-button of your keyboard
      Use Set Band and Set Mode buttons to set Band and/or Mode for all listed calls.
      Use replace /p with * button to replace /p or /P with the wildcard * at the end of all listed calls
      Click on column heading text to sort by a column.
    7. If required the corresponding 425 DXN Bulletin can be loaded into your web browser by a double click on the published bulletin number.
    8. Click on the Import button in the selection window
    9. Close the Configuration window and re-start SpotSpy again by clicking on the Start button of SpotSpy.


    Handling of DXCC Alerts

    In addition to alerts for IOTAs, RDAs and needed callsigns the licensed version of SpotSpy can issue an alert for spots of calls from DXCC entities where there is a need for the band and / or mode according to the DXCC rules. To use that feature it is required to
    1. mark the checkbox for DXCC in the configuration window
    2. select the alert required by clicking on one of the alternatives provided in the combo-box in the DXCC pane of the configuration window
  • Entity not worked on spotted band and mode
  • Entity not confirmed on spotted band and mode (recommended selection)
  • Entity not verified on spotted band and mode
  • Entity not worked on spotted band or mode
  • Entity not confirmed on spotted band or mode
  • Entity not verified on spotted band or mode
  • Entity not worked on any band or mode
  • Entity not confirmed on any band or mode
  • Entity not verified on any band or mode
  • Entity not worked on spotted band
  • Entity not confirmed on spotted band
  • Entity not verified on spotted band
  • Unworked DX Band or Mode

    Please note that contrary to Spotcollectors philosophy the selection Entity not confirmed on spotted band or mode will provide an alert also for those stations which have been worked on that specific band and / or mode but where there is no confirmation available yet. The selection Unworked DX Band or Mode uses the same logic as SpotCollector.


    The first column of SpotSpys alert window named IOTA / RDA will display either the
    1. IOTA number, e.g. EU-037, for a IOTA alert or
    2. RDA number, e.g. CT-02 for a RDA alert or
    3. the word DXCC for a DXCC alert or
    4. the word Marathon for a CQ DX Marathon alert or
    5. the word WAZ for a WAZ alert or
    6. WFF number, e.g. DLFF-069 for an WFF alert or
    7. SOTA number, e.g. W7W/MC-074 for an SOTA alert or
    8. clubinfo, e.g. FOC * 1782,Mark for an clubmember alert or
    9. grid, e.g. EM48 for an FFMA alert or
    10. state, e.g. TX for an WAS alert or
    11. nothing, i.e. will be blank for a needed call sign alert.
    For cases where a DXCC alert is a needed call sign alert as well two lines, i.e. both alerts, will be displayed. The same applies for IOTA, WAZ, Marathon, WAS, clubmembers, SOTA, WFF, FFMA and RDA alerts.

    Last IOTA spots tracking (if enabled in configuration window)

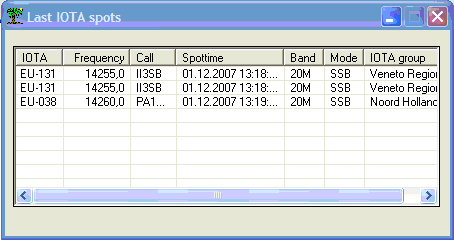
    If a new spot with IOTA information is found, SpotSpy displays IOTA reference number, frequency, Call sign, Spot-Time, Band, Mode and IOTA group name in SpotSpy's Last IOTA spots window.


    Clicking on the reference number opens a new window and displays previous contacts with stations on this IOTA entity.


    External Alarm

    Some users are interested to get an additional specific alarm beyond Spotcollectors capabilities for acoustical alarms when a needed call sign is detected, e.g. BS7H or VU7MY or whatever is possible. This allows the user to be somewhere else in his home or on his property, being together with his family or friends instead of sitting in front of the radio and Spotcollector and waiting for that specific station to show up. Such a feature avoids spending hour for hour just for waiting instead of doing whats required somewhere else.

    SpotSpy provides the feature of external signalling by generating an RTS high signal on COM1-16, which can be used for all types of signalling together with a small interface (transistor and resistor):

  • switching the PTT of a VHF / UHF radio to transmit to your hand held radio
  • switching on your baby phone or any other PMR device
  • have a mobile phone ringing by applying that signal to your home telephone switch
  • switching on a buzzer or an acoustical device providing a beep of 125 dbA
  • applying an electrical shock when you are already sleeping ;-)

    These are just examples, there are more possibilities depending on the interface which is available.

    To use this feature requires to check the box Serial Port in SpotSpys Configuration window and select one of the COM ports available (1, 2, 3, 4 or none).


    Add the needed call sign by entering the call into the Needed call sign box. Clicking on Add transfers this call into the list of Needed call signs. If you like to remove a call from that list mark it in the list and then click on Remove.

    SMS Alert

    The feature SMS-Alert allows you to send an SMS to a specified mobile phone whenever

  • needed call signs specified in the "Needed call signs" portion of the Configuration window
  • IOTA (unworked) or (unworked or unconfirmed) as specified in the IOTA portion of the Configuration window
  • DXCC as specified in the combo box of the SMS Alert of the Configuration window


  • are spotted in a cluster which is used by Spotcollector. It is necessary to have a connection to the Internet if you would like to use SMS Alert. Please make sure that you have configured your firewall to allow SpotSpy to access the internet.

    How much does 1 SMS cost?: Each message cost between 0,039 and 0,11 Euro (0.05 and 0.15 U.S Dollar) depending on your selected Provider and Service.

    In order to use this feature you have to go through the following steps:

    1. Open the Configuration window
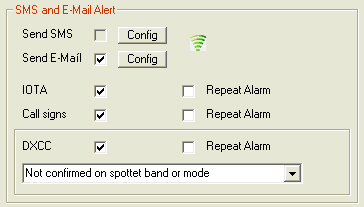
    2. Go to the SMS and E-Mail Alert portion of the Configuration window


    3. Mark the box "Send SMS"
    4. Mark the box "IOTA" if you would like to receive an SMS if an "unworked" or "unworked or unconfirmed" IOTA is spotted according to your selection in the IOTA portion of the Configuration window. Mark the box "Repeat Alarm" if you would like to be notified not only once but every time when there is such a spot
    5. Mark the box "Call signs" if you would like to be notified by an SMS if a call sign is spotted you have specified in the "Needed call signs" portion of the Configuration window. Mark the box "Repeat Alarm" if you would like to be notified not only once but every time when there is such a spot
    6. Mark the box DXCC if you would like to be notified by an SMS if a DXCC is spotted which fulfils the criteria as selected in the combo box, e.g. "Not worked on any band or mode" or "Not confirmed on spotted mode" etc. Mark the box "Repeat Alarm" if you would like to be notified not only once but every time when there is such a spot
    7. Open the SMS Alert Config window.
    8. Select the Provider. Due to cost reasons and reliability of communication SpotSpy currently supports SMS77 and Clickatell.

      Clickatell is recommended for non-German users. Unfortunately SMS77 providers web site is in German language only.
      A detailed procedure for register into SMS77 or Clickatell is given in this help.


    How to register for an Clickatell SMS account ?


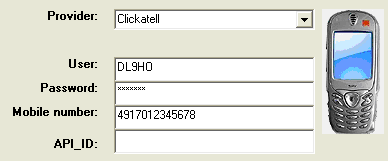
    1. Specify the User (e. g. your call sign)
    2. Specify a Password. Make sure that it will have minimum 6 digits
    3. Specify the Mobile number you would like to receive the SMS
    4. Register at Clickatell. Please go to Clickatell thru this link or click on "Buy SMS Credits" in SpotSpy's SMS configuration window. This makes me earn some cents
    5. Click the button in the form provided
    6. Fill in your registration details (use same User, Password and Mobile number as specified in Step 1 - 3) in the form provided. (Please be aware that all fields in "bold" are mandatory.) Please note that you must ensure that your email and mobile numbers are correct, otherwise you will not be able to complete your registration
    7. Retrieve a code sent to you via email and enter it in the empty email verification field. Retrieve an SMS code sent to your mobile phone and place in the empty SMS verification field
    8. When you have registered, you must add a Connection to your account. Log in in Clickatell and click on "Manage my Products". From there select HTTP and enter a name (eg. your Callsign). The other fields can be left empty.
    9. Write down the API ID from Clickatell and enter this into the API ID textbox in SpotSpy's SMS configuration window
    10. Clickatell offer 10 free SMS credits when you sign up. Please note: The free SMS messages displays only a standard text congratulations! you have just received a Clickatell test.... You must purchase credits to get messages with SpotSpy's alerts. Please go to Clickatell thru this link or click on "Buy SMS Credits" in SpotSpy's SMS configuration window


    You can check your account credits by clicking on "Check credits" in SpotSpy's SMS configuration window.

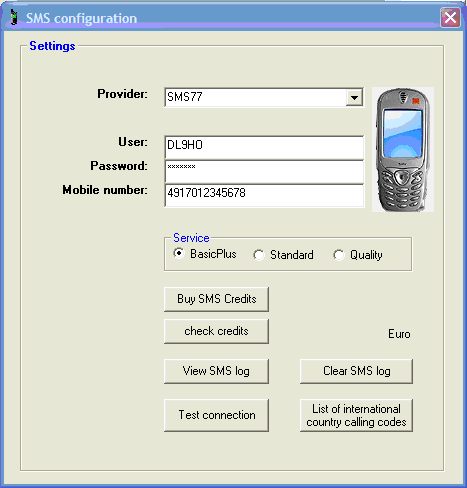
    Your SMS activity will be logged in a file named SMS_log.txt. Click on View SMS log to have a look, what SMS messages have been sent. Clear SMS log clears that file. Click on Test connection will test if there is a connection to Clickatell.

    The button List of international country calling codes leads you to a Wikipedia page with the information about the different country codes, e.g. 49 for Germany, 001 for the US etc.

    How to register for an SMS77 SMS account ?


    1. Specify the User (e. g. your call sign)
    2. Specify a Password. Make sure that it will have minimum 6 digits.
    3. Specify the Mobile number you would like to receive the SMS
    4. Select the Service (marking either BasicPlus, Standard or Quality) which defines the delay of an SMS before it is transmitted. Normally BasicPlus will transmit an SMS in less than 1 minute, Quality in less than 15 seconds. Please note that during New Year, Christmas etc. there might be a significant delay due to the high SMS traffic. Check the web site of the provider for details.
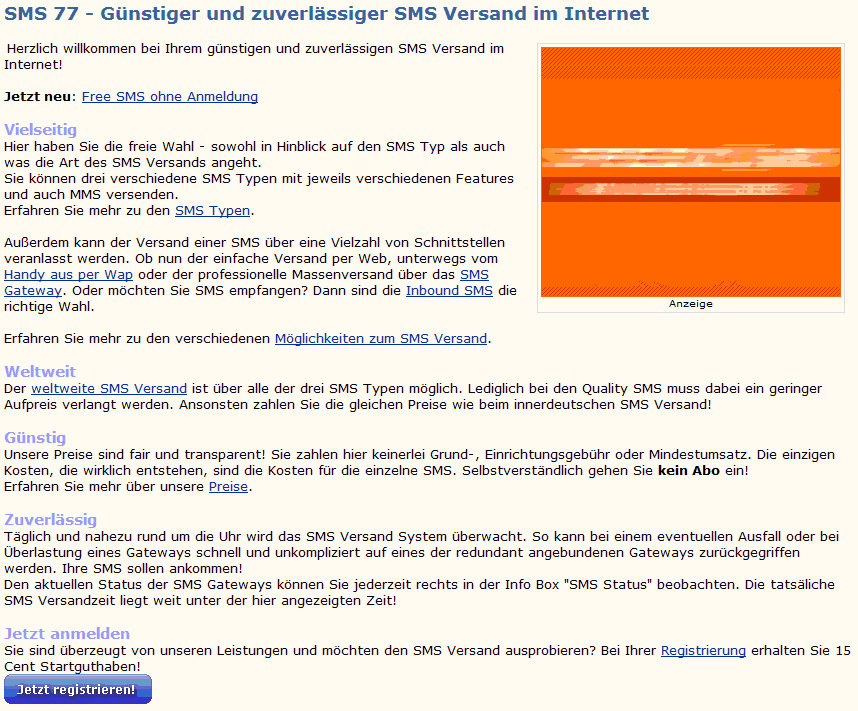
    5. Click on "Buy SMS Credits". Your browser will open the following window:


    6. Unfortunately the Providers web site is in German language only.

      If you are not interested in reading all the information go to the button in the provided form which means "Register Now". Please note that there is neither a basic - nor a registration fee nor a minimum turnover. There is also no subscription. If you would like to know the prices please click on "Preise" in the section "Gnstig" which is about 12 lines above the "Jetzt registrieren" button. The present price for a Quality SMS to countries other than Germany is 0,095 Euro. Please check for possible changes because the SpotSpy author cannot guarantee prices or other terms of SMS77.
    7. The registration process is in 3 Steps. Step 1 is described in 8 - :
    8. "Anrede": select either Herr = Mr. or Frau = Ms (first line "Firma" is for companies only and may be left open).
    9. Vorname = Firstname
    10. Name = Name
    11. Strasse / Hausnummer = Street and Number
    12. Postleitzahl / Ort = Zipcode in the first box, City in the second box
    13. e-Mail Adresse = e-mail address where you will receive your activation code
    14. Geburtstag = birthday (you must be above 18 years to become accepted), please select day (first box), month (second box), year (third box).
    15. Benutzername = User name (e.g. your call sign), the same you have specified in 1.
    16. Passwort = Password , the same you have specified in 2.
    17. Passwort wiederholen = Repeat the password
    18. Mark the box "Ja, ich habe die AGB gelesen und erkenne sie an" if you would like to use the SMS77 service. Click on AGB and read the general terms first and ask somebody for the translation from German into your language. The author doesn't see any problem, however, he cannot accept any liability for any term if a user is accepting these AGB's as the specific situation for different users may be different.
    19. Click on Weiter zu Schritt 2/3
    20. On "Anmeldung - Schritt 2/3" enter your mobile phone number into the box "Handynummer" as specified in 3. There is no specific need to enter your mobile phone number here if you are afraid of receiving SPAM SMS even though you have unchecked the box mentioned in 21. Without entering your mobile phone number here, however, you will also not receive the free 15 credits for few test messages.
    21. Uncheck the box "Ja, ich mchte Werbe SMS erhalten" if you don't want to receive any advertising SMS.
    22. Click on Anmeldung fertigstellen.
    23. On SMS77 you will now see "Anmeldung" and the information that you will receive an e-mail to the address you have specified in the registration process.
    24. Open this e-mail.
    25. Click on the link given in that e-mail and activate your account.
    26. You will also receive an SMS (if you have entered your mobile number in 20.) to your mobile phone "Ihr Password fr die Freischaltung Ihres Accounts lautet xxxxxx. Ihr Team von SMS77.de". Use the six digit password at xxxxxx in the following step.
    27. Log-in at www.sms77.de (upper right side) using your user name and password specified in SpotSpy's SMS configuration window. A window will open and tells you "Herzlich willkommen, Firstname Name" = Welcome Firstname Name. Enter the six digit password of step 16 and enter it into the box "Startguthaben" which tells you that you have 15 Eurocent for start up. Click on Startguthaben freischalten. A window will pop up and tell you that you can now use the 15 Eurocent and send SMS
    28. In order to load your account you have to go to https://www.sms77.de/preise.html and you will find some information in German language. Click on Mein SMS77 and you will come to a recharge page https://www.sms77.de/preise.html?content=account#recharge
    29. The easiest way for Non-Germans is probably the use of Paypal which is the fifth alternative on that page. Select between 5 and 100 Euro (default is 10 Euro) and click on Aufladen per Paypal. It is important to know that only a recharge via this form is possible.
    30. A Paypal window will open. Enter your E-Mail and your Password you use for Paypal and click on Einloggen = Log In. Then the payment will be done.


    You can check your account credits by clicking on "Check credits" in SpotSpy's SMS configuration window.

    Your SMS activity will be logged in a file named SMS_log.txt. Click on View SMS log to have a look, what SMS messages have been sent. Clear SMS log clears that file. Click on Test connection will test if there is a connection to SMS77.

    The button List of international country calling codes leads you to a Wikipedia page with the information about the different country codes, e.g. 49 for Germany, 001 for the US etc.

    e-mail Alert

    The feature E-Mail-Alert allows you to send an e-mail to a specified e-mail adress whenever

  • needed call signs specified in the "Needed call signs" portion of the Configuration window
  • IOTA (unworked) or (unworked or unconfirmed) as specified in the IOTA portion of the Configuration window
  • DXCC as specified in the combo box of the SMS and E-Mail Alert of the Configuration window


  • are spotted in a cluster which is used by Spotcollector. It is necessary to have a connection to the Internet if you would like to use E-Mail Alert. Please make sure that you have configured your firewall to allow SpotSpy to access the internet.

    Many provoders especially in the US allow you to send an SMS message to your phone via e-mail. For instance, you can send an SMS to any Verizon customer by sending an email to 123@vtext.com where 123 is their mobile number. Some people have unlinited SMS messaging.

    In order to use this feature you have to go through the following steps:

    1. Open the Configuration window
    2. Go to the SMS and E-Mail Alert portion of the Configuration window


    3. Mark the box "Send E-Mail"
    4. Mark the box "IOTA" if you would like to receive an e-mail if an "unworked" or "unworked or unconfirmed" IOTA is spotted according to your selection in the IOTA portion of the Configuration window. Mark the box "Repeat Alarm" if you would like to be notified not only once but every time when there is such a spot
    5. Mark the box "Call signs" if you would like to be notified by an e-mail if a call sign is spotted you have specified in the "Needed call signs" portion of the Configuration window. Mark the box "Repeat Alarm" if you would like to be notified not only once but every time when there is such a spot
    6. Mark the box DXCC if you would like to be notified by an e-mail if a DXCC is spotted which fulfils the criteria as selected in the combo box, e.g. "Not worked on any band or mode" or "Not confirmed on spotted mode" etc. Mark the box "Repeat Alarm" if you would like to be notified not only once but every time when there is such a spot
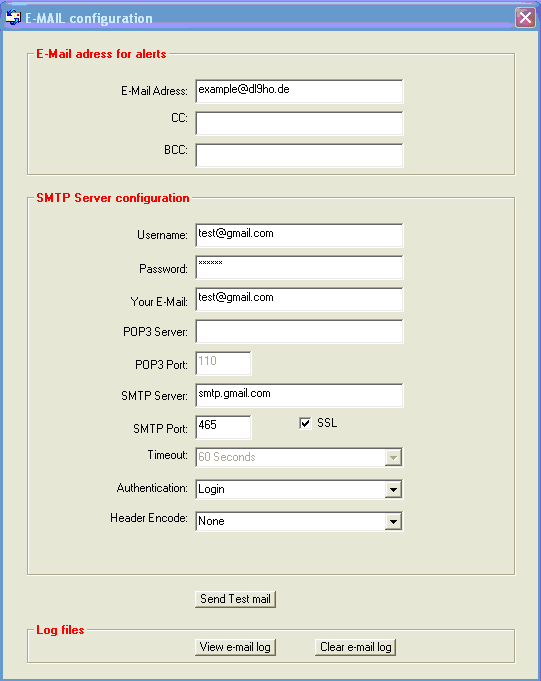
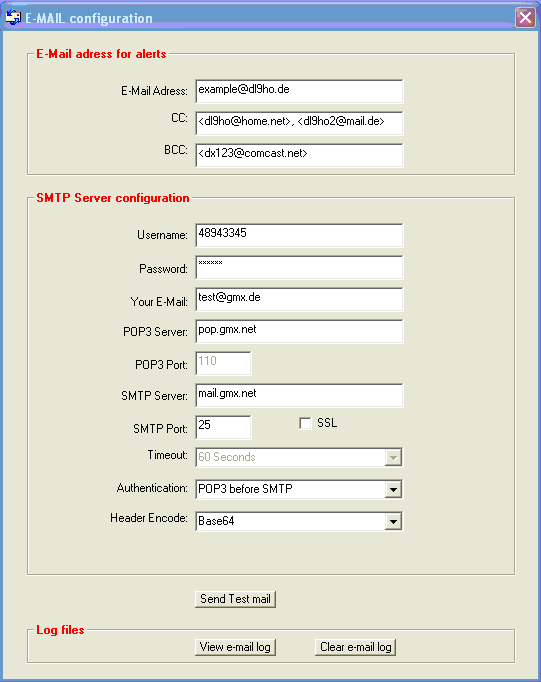
    7. Click on Config to open the E-Mail Alert Configuration window.


    8. Specify the e-mail adress you would like to send the e-mail alerts. Use CC and or BCC to send e-mail alerts to multiple mail recipients. Syntax for CC and BCC is <dl9ho@anywhere.com>, <dl9ho2@athome.de>
    9. Specify Username, Password and e-mail adress for the outgoing SMTP server
    10. Specify POP3 Server (not necessary if SSL is enabled) and SMTP Server. Check SSL checkbox if the outgoing email server requires the use of SSL encryption.
    11. Specify Header Encode (Default is Base64, use None for plain text)
    12. Close configuration window to save the configuration

    Your e-mail activity will be logged in a file named MAIL_Log.txt. Click on View e-mail log to have a look, what e-mails have been sent. Clear e-mail log clears that file.

    Working with SpotSpy

    Pressing the Start button will start the scan process. This process is active until you press the Stop button. A green or red label directly above this button keeps you informed with SpotSpy's status. If the SMS feature is activ will be displayed.


    If you want SpotSpy to automatically start the scan process without waiting for you to click the Start button, then check the Configuration window's Auto Start box.

    Pressing the New? button will direct you to the SpotSpy's updater window. Press the Check for Update button to get information about new releases. If a new version of SpotSpy is available, you can download the newer version. Updates will be installed without any further action needed.

    SpotSpy automatically remembers the positions of all SpotSpy windows from one SpotSpy session to another.

    Starting SpotSpy when you start DXLab

    The DXLab Launcher allows you to start SpotSpy when you start a group of DXLab applications. To use this feature, click on the Config button in the Launcher's Main window and specify SpotSpy's pathname.


    Support

    SpotSpy is still freeware. I have developed it for my own needs, but you can participate on the results for free.

    If you would like to support my work, you can donate a few bucks ( 10 Euro or US-Dollar ) for a pizza and a beer.

    If you do so, you will get a activation code for extended filter options (Call sign, band and mode) , DXCC and CQ DX Marathon alerts.

    When donating on the PayPal site, you'll be prompted to insert the program ID number which is shown after clicking on the More filters? button in SpotSpy's configuration window.

    After you've made your PayPal donation, you'll get the activation code by e-mail. Copy the key.dat file into SpotSpy's folder, start SpotSpy, go to Configuration window and click on the Read key.dat button.


    Send me an email and let me know if you find a bug. Any suggestions for new or better features are always welcome.

    73 de Volker, DL9HO


    (c) 2007 - 2020 Volker Rose, DL9HO
    Homepage: http://www.dl9ho.de/SpotSpy/SpotSpy.htm
    SpotSpy Download page: http://www.dl9ho.de/adidl.html
    Program support: EMail: dl9ho@gmx.net

    Other Tools from DL9HO

    LogPublisher - supports real time QSO upload to HRDLog.net / QRZ.com logbook and sends On Air status - interoperation with DXKeeper / Commander
    Homepage: http://www.dl9ho.de/LogPublisher/LogPublisher.htm

    PROADIKON ADIF conversion tool